Just listen to Alex

August 7, 2011

Java Swing: automatically resize table columns to their contents

Filed under: Uncategorized — Tags: , — bosmeeuw @ 4:45 pm

When using JTables in Swing, you will notice that by default, all columns have the same size. Either the user can resize the columns to better represent the data in the column (which they need to do every time they open the screen), or the programmer can decide to set a specific width on each column. Of course, the programmer might not always know what kind of data will show up in the table, and what width is required for each column.

The easiest solution to this problem, is to automically resize table columns based on the data in the table, like shown in the video below:

The way this works, is that we render the entire table (invisible), and check the maxium required width for each column. If the table is big enough to display all data, we size all columns to display everything. If the table is too small, for instance when one of the cells contains a very long string, we make the biggest column(s) smaller until the data does fit.

The code to execute the resize is very simple:

ColumnsAutoSizer.sizeColumnsToFit(table);

We can also hook up an event listener to automatically resize the columns every time data is added or changed in the table, like this:

table.getModel().addTableModelListener(new TableModelListener() {
	public void tableChanged(TableModelEvent e) {
		ColumnsAutoSizer.sizeColumnsToFit(table);
	}
});

You’ll find the source for ColumnsAutoSizer and the demo app below:

package be.alex.examples;

import javax.swing.*;
import javax.swing.table.DefaultTableCellRenderer;
import javax.swing.table.JTableHeader;
import javax.swing.table.TableCellRenderer;
import javax.swing.table.TableColumn;
import java.awt.Component;
import java.awt.FontMetrics;

public class ColumnsAutoSizer {

    public static void sizeColumnsToFit(JTable table) {
        sizeColumnsToFit(table, 5);
    }

    public static void sizeColumnsToFit(JTable table, int columnMargin) {
        JTableHeader tableHeader = table.getTableHeader();

        if(tableHeader == null) {
            // can't auto size a table without a header
            return;
        }

        FontMetrics headerFontMetrics = tableHeader.getFontMetrics(tableHeader.getFont());

        int[] minWidths = new int[table.getColumnCount()];
        int[] maxWidths = new int[table.getColumnCount()];

        for(int columnIndex = 0; columnIndex < table.getColumnCount(); columnIndex++) {
            int headerWidth = headerFontMetrics.stringWidth(table.getColumnName(columnIndex));

            minWidths[columnIndex] = headerWidth + columnMargin;

            int maxWidth = getMaximalRequiredColumnWidth(table, columnIndex, headerWidth);

            maxWidths[columnIndex] = Math.max(maxWidth, minWidths[columnIndex]) + columnMargin;
        }

        adjustMaximumWidths(table, minWidths, maxWidths);

        for(int i = 0; i < minWidths.length; i++) {
            if(minWidths[i] > 0) {
                table.getColumnModel().getColumn(i).setMinWidth(minWidths[i]);
            }

            if(maxWidths[i] > 0) {
                table.getColumnModel().getColumn(i).setMaxWidth(maxWidths[i]);

                table.getColumnModel().getColumn(i).setWidth(maxWidths[i]);
            }
        }
    }

    private static void adjustMaximumWidths(JTable table, int[] minWidths, int[] maxWidths) {
        if(table.getWidth() > 0) {
            // to prevent infinite loops in exceptional situations
            int breaker = 0;

            // keep stealing one pixel of the maximum width of the highest column until we can fit in the width of the table
            while(sum(maxWidths) > table.getWidth() && breaker < 10000) {
                int highestWidthIndex = findLargestIndex(maxWidths);

                maxWidths[highestWidthIndex] -= 1;

                maxWidths[highestWidthIndex] = Math.max(maxWidths[highestWidthIndex], minWidths[highestWidthIndex]);

                breaker++;
            }
        }
    }

    private static int getMaximalRequiredColumnWidth(JTable table, int columnIndex, int headerWidth) {
        int maxWidth = headerWidth;

        TableColumn column = table.getColumnModel().getColumn(columnIndex);

        TableCellRenderer cellRenderer = column.getCellRenderer();

        if(cellRenderer == null) {
            cellRenderer = new DefaultTableCellRenderer();
        }

        for(int row = 0; row < table.getModel().getRowCount(); row++) {
            Component rendererComponent = cellRenderer.getTableCellRendererComponent(table,
                table.getModel().getValueAt(row, columnIndex),
                false,
                false,
                row,
                columnIndex);

            double valueWidth = rendererComponent.getPreferredSize().getWidth();

            maxWidth = (int) Math.max(maxWidth, valueWidth);
        }

        return maxWidth;
    }

    private static int findLargestIndex(int[] widths) {
        int largestIndex = 0;
        int largestValue = 0;

        for(int i = 0; i < widths.length; i++) {
            if(widths[i] > largestValue) {
                largestIndex = i;
                largestValue = widths[i];
            }
        }

        return largestIndex;
    }

    private static int sum(int[] widths) {
        int sum = 0;

        for(int width : widths) {
            sum += width;
        }

        return sum;
    }

}

Demo app:

package be.alex.examples;

import javax.swing.*;
import javax.swing.event.TableModelEvent;
import javax.swing.event.TableModelListener;
import java.awt.Dimension;
import java.awt.FlowLayout;
import java.awt.event.ActionEvent;
import java.awt.event.ActionListener;

public class ResizeColumnsDemo extends JPanel {
    public ResizeColumnsDemo() {
        super(new FlowLayout());

        String[] columnNames = {"First Name",
                                "Last Name",
                                "Sport",
                                "# of Years",
                                "Vegetarian"};

        Object[][] data = {
	    {"Kathy", "Smith", "Snowboarding", new Integer(5), new Boolean(false)},
	    {"John", "Doe", "Rowing", new Integer(3), new Boolean(true)},
	    {"Sue", "Black", "Knitting", new Integer(2), new Boolean(false)},
	    {"Jane", "White", "Speed reading", new Integer(20), new Boolean(true)},
	    {"Joe", "Brown", "Pool", new Integer(10), new Boolean(false)}
        };

        final JTable table = new JTable(data, columnNames);
        table.setPreferredScrollableViewportSize(new Dimension(500, 70));
        table.setFillsViewportHeight(true);

        // automatically resize the columns whenever the data in the table changes
        table.getModel().addTableModelListener(new TableModelListener() {
            public void tableChanged(TableModelEvent e) {
                ColumnsAutoSizer.sizeColumnsToFit(table);
            }
        });

        JButton autoSizeButton = new JButton("Auto-size columns");

        // resize the columns when the user clicks the button
        autoSizeButton.addActionListener(new ActionListener() {
            public void actionPerformed(ActionEvent e) {
                ColumnsAutoSizer.sizeColumnsToFit(table);
            }
        });


        JButton setLongNameButton = new JButton("Set longer name");

        // set a longer name to test automatic resizing after value changes
        setLongNameButton.addActionListener(new ActionListener() {
            public void actionPerformed(ActionEvent e) {
                table.getModel().setValueAt("Kathy Kathy Kathy", 0, 0);
            }
        });

        JButton setVeryLongNameButton = new JButton("Set very long name");

        // set a longer name to test automatic resizing after value changes
        setVeryLongNameButton.addActionListener(new ActionListener() {
            public void actionPerformed(ActionEvent e) {
                table.getModel().setValueAt("Kathy Kathy Kathy Kathy Kathy Kathy Kathy Kathy Kathy Kathy Kathy", 0, 0);
            }
        });

        //Create the scroll pane and add the table to it.
        JScrollPane scrollPane = new JScrollPane(table);

        //Add the scroll pane to this panel.
        add(scrollPane);

        add(autoSizeButton);

        add(setLongNameButton);

        add(setVeryLongNameButton);
    }

    /**
     * Create the GUI and show it.  For thread safety,
     * this method should be invoked from the
     * event-dispatching thread.
     */
    private static void createAndShowGUI() {
        //Create and set up the window.
        JFrame frame = new JFrame("SimpleTableDemo");
        frame.setDefaultCloseOperation(JFrame.EXIT_ON_CLOSE);

        //Create and set up the content pane.
        ResizeColumnsDemo newContentPane = new ResizeColumnsDemo();
        newContentPane.setOpaque(true); //content panes must be opaque
        frame.setContentPane(newContentPane);

        //Display the window.
        frame.setSize(600, 200);
        frame.setVisible(true);
    }

    public static void main(String[] args) {
        //Schedule a job for the event-dispatching thread:
        //creating and showing this application's GUI.
        javax.swing.SwingUtilities.invokeLater(new Runnable() {
            public void run() {
                createAndShowGUI();
            }
        });
    }
}

July 21, 2011

PHP: Using objects as keys for a hash

Filed under: Uncategorized — bosmeeuw @ 1:58 pm

Hashes, or “associative arrays” are the bread and butter of PHP. Pretty much every PHP project will contain arrays this:

$peopleById = array(1234 => 'Alex', 1235 => 'Jimmy');

If you’re using PHP in an object oriented way, you might want to use hashmaps of objects, and you might want to use your objects as keys. So you try something like this:

class Author {
    public $name;

    function __construct($name) {
        $this->name = $name;
    }
}

class Book {
    public $name;

    function __construct($name) {
        $this->name = $name;
    }
}

$booksByAuthor = array();

$author = new Author("Ian McEwan");

$booksByAuthor[$author] = array(new Book("Atonement"), new Book("Solar"));

However, PHP will throw a “Warning: Illegal offset type” when trying to use the Author object as a key, and your array will be empty.

Fear not, we can fix this, with our very own hashmap class! Only one change to the code is needed:

$booksByAuthor = new HashMap();

$author = new Author("Ian McEwan");

$booksByAuthor[$author] = array(new Book("Atonement"), new Book("Solar"));

Unfortunately, it probably isn’t possible (or I haven’t found out how) to use a standard foreach($hash as $key => $value) to loop over this HashMap, but we can use this form:

foreach($booksByAuthor->keys() as $author) {
    foreach($booksByAuthor[$author] as $book) {
        echo $author->name . " wrote " . $book->name . "<br />";
    }
}

You can use $booksByAuthor->values() to loop over the values.

By default, this hashmap uses object identity to keep the keys apart. This means that if you create two objects, they will represent a different key, even if their values are exactly the same. For example, the assertion below will fail:

class Customer {
    public $id;

    function __construct($id) {
        $this->id = $id;
    }
}

$customer = new Customer(123);
$sameCustomer = new Customer(123);

$creditPerCustomer = new HashMap();

$creditPerCustomer[$customer] = 1000;
$creditPerCustomer[$sameCustomer] = 1500;

assert($creditPerCustomer[$customer] == 1500);

Because “sameCustomer” is a different object, the value will remain at 1000 and the assertion will fail, even though we might want to treat it as an equivalent key. We can fix this by having Customer implement interface HashCodeProvider, like this:

class Customer implements HashCodeProvider {
    public $id;

    function __construct($id) {
        $this->id = $id;
    }

    public function getHashCode() {
        return $this->id;
    }
}

$customer = new Customer(123);
$sameCustomer = new Customer(123);

$creditPerCustomer = new HashMap();

$creditPerCustomer[$customer] = 1000;
$creditPerCustomer[$sameCustomer] = 1500;

assert($creditPerCustomer[$customer] == 1500);

Your getHashCode() method can return any scalar value (int, string, etc), as long as it really represents the identity of the object.

You can grab the simple code for the HashMap class below. Happy hashing!

interface HashCodeProvider {
    public function getHashCode();
}

class HashMap implements ArrayAccess {

    private $keys = array();

    private $values = array();

    public function __construct($values = array()) {
        foreach($values as $key => $value) {
            $this[$key] = $value;
        }
    }

    public function offsetExists($offset) {
        $hash = $this->getHashCode($offset);

        return isset($this->values[$hash]);
    }

    public function offsetGet($offset) {
        $hash = $this->getHashCode($offset);

        return $this->values[$hash];
    }

    public function offsetSet($offset, $value) {
        $hash = $this->getHashCode($offset);

        $this->keys[$hash] = $offset;
        $this->values[$hash] = $value;
    }

    public function offsetUnset($offset) {
        $hash = $this->getHashCode($offset);

        unset($this->keys[$hash]);
        unset($this->values[$hash]);
    }

    public function keys() {
        return array_values($this->keys);
    }

    public function values() {
        return array_values($this->values);
    }

    private function getHashCode($object) {
        if(is_object($object)) {
            if($object instanceof HashCodeProvider) {
                return $object->getHashCode();
            }
            else {
                return spl_object_hash($object);
            }
        }
        else {
            return $object;
        }
    }

}

July 22, 2010

Hibernate data import, big sessions and slow flushing

Filed under: programming — Tags: , — bosmeeuw @ 8:03 pm

Have you ever done something like this with JPA/Hibernate?

for(Map<String,String> line : someCsvDataSource) {
	em.persist(createSomeDataObjectFromLine(line));
	em.flush();
}

If you’re creating more than a few hundred lines that way, you’ll soon see a drastic slowdown, with Hibernate eventually taking more than a second per line to do its work. The reason for this is that the Hibernate session becomes larger and larger as you persist more objects. This, in turn will cause the em().flush() to become really slow.

The fix for this is clearing your session every once in a while, like this:

int index = 0;

for(Map<String,String> line : someCsvDataSource) {
	em.persist(createSomeDataObjectFromLine(line));
	em.flush();
	
	index++;
	
	if(index % 100 == 0) {
		em.clear();
	}
}

Of course, this will “detach” any persistent objects you might have kept a reference to. Also note you absolutely need to do a manual flush before you clear your persistence context, else your data will be plain lost.

By the way: don’t use FlushMode.AUTO, it’s way too slow for practical use. You’ll be mad at yourself for having relied on it when you need to get rid of it to save your server’s performance.

January 16, 2010

Warning your web app users about navigating away while they have unsaved changes

Filed under: programming — Tags: , — bosmeeuw @ 12:09 pm

Have you ever spent a considerable amount of time filling in a <form> on a web page, only to accidently press “Back” or otherwise navigate away from the page, losing all the information you’ve just inputted in your form?

There’s an easy way to warn users about navigating away after they’ve inputted data on a web page. Just attach an “onchange” listener to every input element on the page, and set window.onbeforeunload() to nag the user if they try to navigate away. Clear the nagger the moment a form is submitted (and the user’s changes are sent to the server).

Here’s the code, using jQuery:

$(function() {
	$('input, select, textarea').change(function() {
		window.onbeforeunload = function() {
			return "Are you sure you want to leave this page? You have unsaved changes!";
		}
	})

	$('form').submit(function() {
		window.onbeforeunload = function() { };
	})
})

If you’re using Prototype, use this (a little more verbose):

document.observe('dom:loaded', function() {
	$$('input', 'select', 'textarea').each(function(input) {
		input.observe('change',function() {
			window.onbeforeunload = function() {
				return "Are you sure you want to leave this page? You have unsaved changes!";
			}
		})
	})

	$$('form').each(function(form) {
		form.observe('submit',function() {
			window.onbeforeunload = function() { };
		})
	})
)

July 1, 2009

Fake Java properties and how they improve JPA

Filed under: programming — Tags: , — bosmeeuw @ 5:52 pm

It doesn’t look like Java will be getting real property support in our lifetimes. This is too bad, because being able to refer to properties of an object in a type-safe way is really valuable when developing applications with a large domain. Take a gander a this JavaBean:

@Entity
public class Person {
    private String name;

    public String getName() {
        return name;
    }

    public void setName(String name) {
        this.name = name;
    }
}

Let’s say I’ve developed a 50.000 class, 10 million lines of code application using this JavaBean as my domain model. I’m of course using JPA. My business logic is riddled with heavily complex JPQL statements such as this one:

Person leaderOfTheFreeWorld = em.createQuery(
  "FROM Person p WHERE p.name = :name"
).setParameter("name", "Barack Obama").getSingleResult();

Now the users demand the impossible, and tell me they want to keep the first name and last name of people in seperate fields. After adding a “firstName” field to my JavaBean and maybe migrating the data, I need to change my heavily complex JPQL query to this:

Person leaderOfTheFreeWorld = em.createQuery(
   "FROM Person p WHERE p.name = :name AND p.firstName = :firstName"
).setParameter("name", "Obama").setParameter("firstName", "Barack").getSingleResult();

That’s fine really, but remember I have 50.000 classes with 10 million lines of code, and I need to make sure all queries that use the “name” field are updated. What do I do? A text search for “name”? I’m guessing a lot of hits are coming my way. How do I make sure I’ve covered all references to the name field? The answer is, of course: fake properties!

Let’s change the original JavaBean to this:

public class Person {
    
    private String name;
    public static final String NAME = "name";
    
    public String getName() {
        return name;
    }

    public void setName(String name) {
        this.name = name;
    }
}

Notice the public static final reference to my field. Now look at this type safe way to refer to my model in JPQL:

em.createQuery(
   "FROM " + Person.class.getName()  + " p WHERE p." + Person.NAME + " = :name"
).setParameter("name", "Barack Obama").getSingleResult();

What does that get you?

  1. Autocompletion: Your IDE autocompletes the “Person.class” and “Person.NAME” parts of the query. No having to look at the model class to remember if the field was called “name” or “birthGivenPersonalDiscriminator”
  2. Navigability: you can jump to the declaration of the Person from within your query
  3. Refactor safety: you can rename the Person class, and the name field. Of course for the name field, you will need to modify your static reference as well. But it’s right there under your field declaration, so it’s very hard to forget this
  4. Traceability: you can ask your IDE to show you all instances where the “Person.NAME” property is accessed and make sure you have seen all usages if you need to do some refactoring or just need to know where something is used.
  5. Compile time safety: delete the name field on person (and the static reference), and your compiler will show you were this will cause problems
  6. You can use the property reference for other things, such as form field binding, i18n for field labels, ..

What are the downsides to this approach?

  1. The query looks uglier / harder to read. Of course, if you were using Hibernate Criteria or some kind of JPQL builder to avoid messy string concatenation, the property access would blend in much better and be easier on your fingers.
  2. You will have a static field for every field in your models, which is a little bit cluttering when reading the source code. If this bothers you, you can put the property references in a seperate class like PersonProps.
  3. You need to add the static fields for every field, which is a bit of extra typing and you’re lazy. I’m also lazy, so I made a little eclipse template to automate this somewhat:

eclipse-propref

You can add this to eclipse by going to Java >> Editor >> Templates, and adding a template named “propref” for context “Java” with this pattern:

${line_selection};

public static final String ${newName} = "${word_selection}"

Now when you’re in your model, select the field declaration, press control space, and select “propref”.

Yes, this method is complete overkill for a one-bean application, it’s just an example.

May 1, 2009

JRuby on Rails, PDF generation and Flying Saucers

Filed under: Uncategorized — bosmeeuw @ 2:01 pm

There are tons of ways to generate PDF documents in just about any language. If you’re using Ruby, you have a number of libraries at your disposal to generate PDF documents using the specific API’s of these libraries. But if you have a Rails or other Ruby web application, the primary goal of your application is outputting HTML to be displayed in clients web browsers. So, wouldn’t it be nice to generate your PDF reports the same way, by outputting HTML?

If you’re running JRuby on Rails, this is a piece of cake! Using the great Flying Saucer Project (AKA xhtmlrenderer), you can convert your HTML + CSS to PDF documents. The great thing about Flying Saucer is that it will mostly render your HTML to PDF the same way standard compliant browsers will render it to screen. You have most of CSS 2.1 at your disposal, plus some custom CSS properties to handle print-specific matters such as paginated tables, and complex headers and footers. It has suprisingly few bugs, which really is an achievement when you’re talking about a HTML renderer. Did I mention it’s pretty fast, even for very large documents?

Of course, this is a Java library, so you need to be running JRuby to use it from your Rails application (or you need to resort to interfacing with it through the command line). First thing you need to do is installing the Flying Saucer gem, provided by the Wolfe project:

jruby -S gem install flying_saucer

This will automatically download the needed java library jars (flying saucer itself and iText) and put them in your gems folder.

Next, create a Rails controller you will use to output your PDF documents, for instance “ReportingController”. Let’s have it output a basic Hello World PDF.

The code for the controller (note the “render_pdf” method):

require "java"
require "flying_saucer"

class ReportingController < ApplicationController
  layout "pdf"

  def hello
    @text = "Hello world"

    render_pdf("hello.pdf")
  end

  private

  def render_pdf(filename)
    @html = render_to_string

    html_file = java.io.File.createTempFile(params&#91;:action&#93;, ".html")
    html_file.delete_on_exit

    pdf_file = java.io.File.createTempFile(params&#91;:action&#93;, ".pdf")
    pdf_file.delete_on_exit

    file_output_stream = java.io.FileOutputStream.new(html_file)
    file_output_stream.write(java.lang.String.new(@html).get_bytes("UTF-8"))
    file_output_stream.close

    renderer = org.xhtmlrenderer.pdf.ITextRenderer.new

	# if you put custom fonts in the lib/fonts folder under your Rails project, they will be available to your PDF document
	# Just specify  the correct font-family via CSS and Flying Saucer will use the correct font.
    fonts_path = RAILS_ROOT + "/lib/fonts/*.ttf"

    if File.exist?(fonts_path)
      font_resolver = renderer.getFontResolver()

      Dir&#91;fonts_path&#93;.each do |file|
        font_resolver.add_font(file, true)
      end
    end

    renderer.set_document(html_file)
    renderer.layout
    renderer.createPDF(java.io.FileOutputStream.new(pdf_file), true)

    send_file pdf_file.path, :type => "application/pdf", :filename => filename, :disposition => "attachment"
  end
end

The main layout for our PDF documents:

<html>
   <head>
      <style type="text/css">
         body {
            font-family: sans-serif;
         }
      </style>
   </head>
   <body>
      <h1>My PDF Wielding Application Title</h1>

      <%= yield %>
   </body>
</html>

And the code to the view for the “hello” action:

Cliché message goes here: <strong><%=h @text %></strong>

Surfing to /reporting/hello will generate this PDF document.

So, the gist is: render all you want (as long as it’s properly escaped XHTML), call the render_pdf method and voila, instant PDF! Feel free to re-use your existing partials and helpers, it’s all good.

One remark: if you refer to resources like stylesheets and images, you must use an absolute URL or FlyingSaucer won’t be able to access them. For instance, use:

<link rel="stylesheet" type="text/css" href="http://app.example.com/stylesheets/reports.css" />

In stead of:

<link rel="stylesheet" type="text/css" href="/stylesheets/reports.css" />

Happy reporting!

January 17, 2009

Easily repeating HTML form sections without (much) javascript

Filed under: programming, Uncategorized — Tags: , , — bosmeeuw @ 2:49 pm

If you’ve written more than a few data-driven web applications, you’ve surely encountered data models where a “master object” has multiple “child objects”.

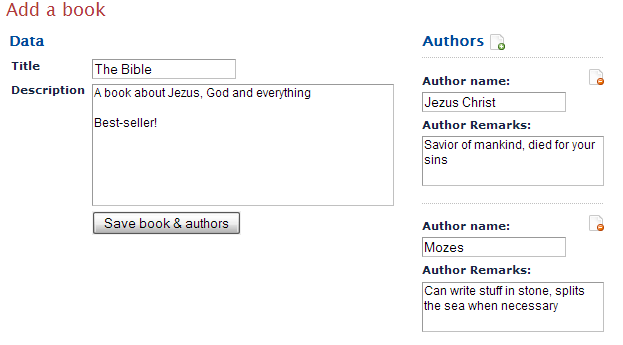
In this example, we’ll use a book which can have many authors.
You could have the user enter the data for the book, and then add the authors one by one using multiple HTTP requests. Of course, this way the user needs to make many round trips to the server, which might slow him down considerably.

So you accomodate the user and write some javascript to enable him to add the X authors before posting anything to the server, yielding something like this:

Screenshot of expanding form (icons by famfamfam.com)

Screenshot of expanding form (icons by famfamfam.com)

There’s many approaches to programming this feature, the worst one being manually concatening HTML in a Javascript function and appending it to a container’s innerHTML attribute.

Below, you can find some code which allows you to create a repeating form like the one in the screenshot with just 3 lines of javascript. The idea is to create your repeating form element in plain HTML, and then attach some javascript behaviour to it which enables the user to repeat the form element. The Prototype Javascript library is required.

Here’s the code for the form:

<h1>Add a book</h1>

<form method="POST" action="/books/save_book">
   <table class="horizontal-layout">
      <tr>
         <td class="left">
            <h2>Data</h2>

            <table class="form">
               <tr>
                  <th>Title</th>
                  <td>
                     <input type="text" name="book&#91;title&#93;" />
                  </td>
               </tr>
               <tr>
                  <th>Description</th>
                  <td>
                     <textarea name="book&#91;description&#93;" class="medium"></textarea>
                  </td>
               </tr>
               <tr>
                  <th></th>
                  <td>
                     <input type="submit" class="submit" value="Save book &amp; authors" />
                  </td>
               </tr>
            </table>
         </td>
         <td>
            <h2>
               Authors
               <img src="/images/icons/page_white_add.png" id="add-author" class="link" />
            </h2>


            <div>
               <div
                  id="author-element"
                  class="expandable-form-entry"
                  style="line-height: 2em;"
               >
                  <input type="hidden" name="author&#91;#index&#93;&#91;id&#93;" />

                  <img src="/images/icons/page_white_delete.png" class="delete-entry link" />

                  <strong>Author name:</strong>
                  <br />
                  <input type="text" class="required" name="authors&#91;#index&#93;&#91;name&#93;" />

                  <br />

                  <strong>Author Remarks:</strong>
                  <br />
                  <textarea class="small" name="author&#91;#index&#93;&#91;remarks&#93;"></textarea>
               </div>
            </div>
         </td>
      </tr>
   </table>
</form>

<script type="text/javascript">
   var authorsExpander = new ExpandingFormElement({
      entryModel: 'author-element',
      addEntryLinkElement: 'add-author',
      deleteEntryElementClass: 'delete-entry',
      deletionConfirmText: "Are you sure you want to delete author?"
   })
</script>

Notice the input elements for the authors are named “author[#index][field_name]”. Each input name must contain the string “#index”, as the javascript code will replace this by the correct index of the element in the form. So if the user adds three authors, the third element will contain elements “author[2][name]” and “author[2][remarks]”, which you can easily save to your database server side.

The javascript at the bottom couples the expanding element behaviour and has these options:

  • entryModel: the id of the element you want to use as the model for the repeating element
  • addEntryLinkElement: the element the user will click to add a new entry
  • deleteEntryElementClass: the css class of the element the user can click to remove and added entry
  • deletionConfirmText: the text to confirm deletion of an entry (leave empty if you don’t want to ask for confirmation)

After you’ve saved the data to your database, the user might want to edit the data. This means you need to re-populate the data back to the form. This can be done using the addEntry() method of ExpandingFormElement, which can take a hash containing the data for the entry. The keys of the hash must correspond with the field name (the part after the [#index]). In a ruby on rails application, you could populate the data like this:

var authorsExpander = new ExpandingFormElement({
  entryModel: 'author-element',
  addEntryLinkElement: 'add-author',
  deleteEntryElementClass: 'delete-entry',
  deletionConfirmText: "Are you sure you want to delete author?"
})

<% @book.authors.each do |author| %>
	authorsExpander.addEntry(<%= author.attributes.to_json %>)
<% end %>

In PHP, you might use the json_encode() function on an associative array containing your author data.

Here’s the javascript code for the ExpandingFormElement class. The Prototype javascript library is required.

var ExpandingFormElement = Class.create({
    initialize: function(options) {
        this.options = options

        this.entryModel = $(options.entryModel)
        this.container = $(this.entryModel.parentNode)

        this.container.cleanWhitespace()

        if(this.container.childNodes.length > 1) {
            throw new Error("The container (parentNode) of the entryModel must contain only the entryModel, and no other nodes (put it in a <div> of its own). The container has " + this.container.childNodes.length + " elements after white space removal.")
        }

        this.entryModel.remove()

        $(options.addEntryLinkElement).observe('click',function() {
            this.addEntry()
        }.bind(this));
    } ,

    addEntry: function(values) {
        var copiedElement = this.entryModel.cloneNode(true)

        this.observeCopiedElement(copiedElement)

        var index = this.getNumberOfEntries()

        this.replaceInputNamesInElement(copiedElement, index)

        this.container.appendChild(copiedElement);

        if(values != null) {
            this.setEntryValues(copiedElement, values)
        }
    } ,

    setEntryValues: function(element, values) {
       $H(values).each(function(entry) {
          var input = this.getInputFromElementByName(element, entry.key)

          if(input) {
              input.value = entry.value;
          }
       }.bind(this));
    } ,

    getInputFromElementByName: function(element, name) {
        var matchedInput = null;

        var inputs = element.select('input','textarea','select')

        inputs.each(function(input) {
           if(input.name.indexOf("[" + name + "]") != -1) {
               matchedInput = input;

               return $break;
           }

           return null;
        });

        return matchedInput;
    } ,

    getNumberOfEntries: function() {
        return this.container.childNodes.length
    } ,

    observeCopiedElement: function(element) {
        var deleteEntryElement;

        if((deleteEntryElement = element.down('.' + this.options.deleteEntryElementClass))) {
            deleteEntryElement.observe('click',function() {
                if(this.options.deletionConfirmText) {
                    if(confirm(this.options.deletionConfirmText)) {
                        element.remove()
                    }
                }
                else {
                    element.remove()
                }
            }.bind(this))
        }
    } ,

    replaceInputNamesInElement: function(element, index) {
        $(element).select("input","textarea","select").each(function(input) {
            input.name = input.name.replace("#index",index)
        }.bind(this))
    }
});

Here’s the CSS I used for this example:

div.expandable-form-entry {
    position: relative;
    border-top: 1px dotted silver;
    padding-top: 1em;
    margin-bottom: 1em;
}

div.expandable-form-entry img.delete-entry {
    position: absolute;
    right: 0;
}

December 22, 2008

Finding out exactly which entities are causing a ConstraintViolationException (JPA)

Filed under: programming — Tags: , , — bosmeeuw @ 8:27 pm

Say you have an application using JPA. Your users can use and administrate lists of entities. They probably have the ability to permanently delete entities from the database.

If the entity the user wants to delete is used on another entity, the database should throw you a nice ConstraintViolationException, which JPA will (curiously) wrap in an EntityExistsException. You can catch this exception and display a nice informational message saying “You can’t delete this item because it’s already been used!”. This is better than just showing them the error the database spat out.

But what if you have a many entities, which have many relations between eachother? The user might want to find out just where their item is being used. And you might not feel like writing code to scan all your tables to find the item refering to the entity that’s being deleted. Below, I will explain how you can find out which entities are blocking the deletion of an arbitrary entity using some Reflection and ClassPath scanning.

Let’s say you have a service method like this:

public void deleteUser(long id) {
	User entity = em.find(User.class, id);
	em.remove(entity);
}

First, you’ll need to catch the Runtime Exception JPA will throw when encountering a constraint violation. Your service method will throw a YourApplicationException, which you will handle upstream and display as a nice error message.

public void deleteUser(long id) throws YourApplicationException {
	try {
		User entity = em.find(User.class, id);
		em.remove(entity);
	}
	catch (EntityExistsException e) {
		throw new YourApplicationException("You tried to delete an item which is in use.", e);
	}
}

To find out which entities are refering to the item we are deleting, we will inspect the database error message and extract the table name of the refering entity. Note the datbase message is specific to the DBMS you are using. I’m using PostgreSQL, if you are using a different DBMS you will probably need to tweak the pattern to match the message your DBMS is spitting out. Once we have the tablename, we will match it to an entity class by scanning the classpath. After that, we fill find out which field on the target class is of the same type as the entity being deleted (using reflection). We then make a query using JPA to fetch the referening entities. We put these entities in the exception, so it can be caught upstream and the entities can be displayed in a list.

Here’s the code for all of this:

public void delete(long id) throws YourConstraintViolationException {
	try {
		User entity = em.find(User.class, id);
		em.remove(entity);
	}
	catch (EntityExistsException e) {
		//need to rollback the transaction because we'll be doing a query later on
		em.getTransaction().rollback();
		em.getTransaction().begin();
		
		List<Object> linkedEntities = null;
		
		linkedEntities = findLinkedEntitiesFromContraintViolation(User.class, id, (ConstraintViolationException) e.getCause());
		
		throw new YourConstraintViolationException(linkedEntities, e);
	}
}

@SuppressWarnings("unchecked")
private List<Object> findLinkedEntitiesFromContraintViolation(Class<?> deletedEntityClass, long deletedEntityId, ConstraintViolationException e) {
	//unravel the exception so we have the SQLException
	BatchUpdateException batchUpdateException = (BatchUpdateException) e.getCause();
	SQLException sqlException = batchUpdateException.getNextException();
	
	List<Object> entities = new ArrayList<Object>();
	
	//match the database error message to find out the refering table name
	Matcher matcher = Pattern.compile("referenced from table \"(.*?)\"").matcher(sqlException.getMessage());
	if(matcher.find()) {
		String tableName = matcher.group(1);
		
		//we need to specify the base package all our entities reside under (possibly in sub-packages), and pass the ClassLoader of one of the entity classes to make the classpath scanning easier
		Class<?> entityClass = ClassUtils.findClassByCaseInsensitiveName(User.class.getClassLoader(), "your.entities.package",tableName);
		
		//check out which fields could possibly refer to the deleted class
		for(Field field : ClassUtils.getAllDeclaredFields(entityClass)) {
			if(field.getType().isAssignableFrom(deletedEntityClass)) {
				//fetch the refering entities using a JPA query and add them to the result
				String query = "FROM " + entityClass.getSimpleName() + " obj WHERE obj." + field.getName() + ".id = :deleted_id";
				List resultList = em.createQuery(query).setParameter("deleted_id",deletedEntityId).setMaxResults(10).getResultList();
				
				entities.addAll(resultList);
			}
		}
	}
	
	return entities;
}

The YourConstraintViolationException could look something like this:

public class YourConstraintViolationException extends Exception {
    
    private List<Object> linkedEntities;

    public YourConstraintViolationException(List<Object> linkedEntities, Throwable cause) {
        super(cause);
        
        this.linkedEntities = linkedEntities;
    }

    public List<Object> getLinkedEntities() {
        return linkedEntities;
    }

}

The code calling your service method might look this this:

try {
	userService.delete(someUserId);
}
catch(YourConstraintViolationException e) {
	out.write("<b>There was an error deleting the user. The user is in use on these items:</b>");
	
	out.write("<ul>");
	for(Object linkedEntity : e.getLinkedEntities()) {
		out.write("<li>" + linkedEntity.toString() + "</li>");
	}
	out.write("</ul>");
}

The actual classpath scanning is going on inside ClassUtils. This class will do its work both when your entities are normal .class files on disk, and when they’re packaged inside a jar. Here’s the code for ClassUtils.java:

import java.io.File;
import java.io.IOException;
import java.lang.reflect.Field;
import java.net.URI;
import java.net.URISyntaxException;
import java.net.URL;
import java.util.ArrayList;
import java.util.Collections;
import java.util.List;
import java.util.jar.JarEntry;
import java.util.jar.JarFile;
import java.util.regex.Matcher;
import java.util.regex.Pattern;

public class ClassUtils {

    public static Class<?> findClassByCaseInsensitiveName(ClassLoader classLoader, String basePackage, String className) throws ClassNotFoundException, IOException, URISyntaxException {
	    URL packageUrl = classLoader.getResource(basePackage.replace(".","/"));
	    
	    Matcher matcher = Pattern.compile("(file:/.*?.jar)!(.*)").matcher(packageUrl.getFile());
        
	    if(matcher.find()) {
	        String jarFileUrl = matcher.group(1);
	        
	        return findClassByCaseInsentiveNameInJar(basePackage, new File(new URI(jarFileUrl)), className);
	    }
	    else {
    	    File packageFolder = new File(packageUrl.getFile());
    	    
    	    return findClassByCaseInsentiveNameInDirectory(basePackage, packageFolder, className);
	    }
	}

    private static Class<?> findClassByCaseInsentiveNameInJar(String basePackage, File jarFilePath, String className) throws IOException, ClassNotFoundException {
        JarFile jarFile = new JarFile(jarFilePath);
        
        String packagePath = basePackage.replace(".","/");
        
        String patternString = Pattern.quote(packagePath) + ".*/" + className + "\\.class";
        
        Pattern pattern = Pattern.compile(patternString, Pattern.CASE_INSENSITIVE);
        
        ArrayList<JarEntry> entries = Collections.list(jarFile.entries());
        
        for(JarEntry entry : entries) {
            Matcher matcher = pattern.matcher(entry.getName());
            
            if(matcher.matches()) {
                String fullClassName = entry.getName().replace("/",".").replace(".class","");
                
                return Class.forName(fullClassName);
            }
        }        
        
        return null;
    }

    private static Class<?> findClassByCaseInsentiveNameInDirectory(String packageName, File packageFolder, String className) throws ClassNotFoundException {
        for(File file : packageFolder.listFiles()) {


            if(file.getName().toLowerCase().equals(className + ".class")) {
                String fullClassName = packageName + "." + file.getName().replace(".class","");
                return Class.forName(fullClassName);
            }
            
            if(file.isDirectory()) {
                String subPackageName = packageName + "." + file.getName();
                Class<?> foundClass = findClassByCaseInsentiveNameInDirectory(subPackageName, file, className);
                
                if(foundClass != null) {
                    return foundClass;
                }
            }
        }
        
        return null;
    }

    public static List<Field> getAllDeclaredFields(Class<?> className) {
        List<Field> fields = new ArrayList<Field>();
        
        Class<?> superClass = className;
        
        do {
            for(Field field : superClass.getDeclaredFields()) {
                fields.add(field);
            }
            
            superClass = superClass.getSuperclass();
        }
        while(superClass != null);
        
        return fields;
    }
}

August 23, 2008

Adding hideable columns to plain HTML Tables using Prototype

Filed under: programming — Tags: — bosmeeuw @ 1:17 pm

I present to you a bit of Javascript code which enables users to change which columns should be visible or hidden in plain HTML tables. It is built using Prototype 1.6.

Click here to see a simple demo. You can grab the javascript code and default style from the demo page.

You enable the behaviour like this:

new AdjustableTableFields($('your-table-id'));

Note that the demo page enables the behaviour by table class name (in a ‘dom:loaded’ event handler).

There’s a few options for you to enjoy:

Add an attribute named “cookie-name” to your table element to have the browser remember the selected columns:

<table class="adjustable-table" cookie-name="demo">

Add an attribute named “unhidable” to the right th element to ensure the user cannot hide a certain column:

<th unhidable="true">ID</th>

Add an attribute named “display-name” to the right th element to use a different name on the checkbox than the TH content:

<th display-name="Fav. Dict.">Favorite Dictator</th>

That’s all there is to it, have fun!

July 12, 2008

Batch downloading cover art with PHP and Google Image Search

Filed under: programming — Tags: — bosmeeuw @ 2:58 pm

Do you happen to have come by a large collection of MP3’s, ordered in folders by album? Are they named something like “Artist Name – Album Name”? Would you like to download the cover for each album so you can browse them like this in explorer?

Screenshot

Yes? Then put the wad of PHP code below into a file (named get_covers.php or whatever you like) in the root folder of your MP3’s, and execute it using PHP. This script will do a google image search for every folder which doesn’t have a folder.jpg and download the resulting image into folder.jpg, providing a nice thumbnail for Windows Explorer. For 99% of my ~500 albums, this worked perfectly.

This script downloads arbitrary image results from Google to your hard drive, directly from the resulting websites, without any attempt at filtering out harmful results. The results may include corrupt or virus infected images and pictures of naked ladies, which can seriously harm your computer.

<?php

$folders = glob('*');

$ctx = stream_context_create(array(
    'http' => array(
        'timeout' => 10
        )
    )
); 

foreach($folders as $folder) {
	if(!is_dir($folder)) {
		echo "Skipping {$folder}\n";
		continue;
	}

	if(is_file($folder."/folder.jpg")) {
		echo "Already have cover for {$folder}\n";
		continue;
	}

	$album = str_replace('_',' ',$folder);

	echo "Checking {$album}.. ";

	$googleUrl = "http://images.google.com/images?um=1&hl=en&safe=off&imgsz=medium&q=".urlencode($album);

	$contents = file_get_contents($googleUrl,0,$ctx);
	
	if(preg_match_all('/imgurl\\\\x3d(.*?)\\\\x26/i',$contents,$matches)) {
		foreach($matches[1] as $image) {
			if($imageContents = file_get_contents($image,0,$ctx)) {
				file_put_contents("{$folder}/folder.jpg",$imageContents);
				echo "Found image {$image}\n";
				break;
			}
		}
	}
	else {
		echo "nothing found!\n";
	}
}
?>
Older Posts »

Create a free website or blog at WordPress.com.